Introduction
Welcome to Quarantine Zone: The Last Check! In this Papers Please-inspired checkpoint simulation game, you’re humanity’s last line of defense against a zombie apocalypse. As a government agent stationed at a critical checkpoint, every decision you make determines who survives and who doesn’t.
This beginner’s guide will teach you the fundamentals of checkpoint management, survivor screening, and base operations to help you succeed in this high-stakes survival game.
Game Overview
What is Quarantine Zone?
Quarantine Zone: The Last Check is a simulation game developed by Brigada Games and published by Devolver Digital. Set during a zombie outbreak, you must:
- Screen survivors using advanced tools
- Detect infections before they spread
- Manage resources to keep your checkpoint operational
- Defend your base from zombie hordes
- Make moral choices that impact humanity’s survival
Key Features
- ✅ Demo Available - Try it free on Steam before the November 2025 release
- ✅ Papers Please Meets Zombies - Inspection mechanics in a survival setting
- ✅ Moral Dilemmas - Every choice has consequences
- ✅ Base Management - Balance resources and upgrades
- ✅ Defense Combat - Fight off zombie attacks with drones and weapons
Your First Day: Quick Start
Step 1: Understanding the Checkpoint
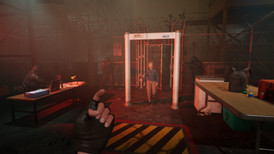
When you start, you’ll be at your checkpoint station. Here’s what you need to know:
Your Workspace:
- Inspection Table - Where survivors present themselves
- Tool Panel - Your screening equipment (UV light, thermometer, scanner)
- Decision Buttons - Allow passage, send to quarantine, or eliminate threat
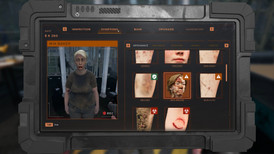
- Tablet - Access base management, upgrades, and purchases
Your Mission: Screen every survivor carefully. Missing an infected person means the virus spreads to your safe zone, potentially causing catastrophic failure.
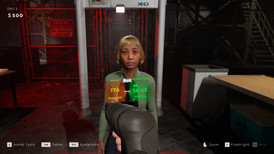
Step 2: First Survivor Interaction
- Listen to their story - Survivors will explain their situation
- Visual inspection - Look for obvious signs of infection or injury
- Use your tools - Scan them with available equipment
- Make a decision - Pass, quarantine, or eliminate
Important: Start conservatively. When in doubt, use the quarantine zone.
Essential Tools & How to Use Them
1. UV Flashlight
Purpose: Reveals hidden bite marks and infections not visible to the naked eye
How to Use:
- Select the UV tool from your panel
- Shine it on the survivor’s exposed skin
- Look for glowing marks or discoloration
- Check arms, neck, and face areas
When to Use: Every survivor should get a UV check, especially if they claim to be healthy.
2. Thermometer
Purpose: Detects elevated body temperature, a common infection symptom
How to Use:
- Point the infrared thermometer at the survivor
- Check the temperature reading
- Normal: 36-37°C (96.8-98.6°F)
- Suspicious: 38°C+ (100.4°F+)
- Infected: 39°C+ (102°F+)
Pro Tip: High fever doesn’t always mean infection, but it warrants quarantine for observation.
3. Manual Scanner
Purpose: Detects contraband items and hidden weapons or supplies
How to Use:
- Run the scanner over the survivor’s body and belongings
- Watch for alerts indicating hidden items
- Question survivors about suspicious items
Important: Some survivors may try to smuggle in infected items or contraband that could compromise your checkpoint.
Understanding Infection Signs
Visible Symptoms
Look for these warning signs during inspection:
Early Stage Infection:
- Coughing or wheezing
- Pale or discolored skin
- Excessive sweating
- Bloodshot eyes
- Minor injuries or scratches
Advanced Infection:
- Open wounds or bite marks
- Severe discoloration
- Erratic behavior
- High fever (39°C+)
- Signs of turning
Hidden Infections
Not all infections are visible. Some survivors may:
- Hide bite marks under clothing
- Lie about their symptoms
- Show no symptoms yet (incubation period)
This is why tools are critical - always use UV light and thermometer checks.
The Quarantine Zone System
How Quarantine Works
The quarantine zone is your observation area for suspicious cases:
- Capacity: Holds up to 4 people initially (upgradeable)
- Observation Period: 2 days maximum
- Purpose: Monitor symptom progression
When to Use Quarantine
Send survivors to quarantine when:
- They have suspicious symptoms but no confirmation
- They’re injured but not obviously infected
- They have a fever but pass other checks
- You’re uncertain about their status
Checking Quarantine Patients
CRITICAL: Always check quarantine patients within 2 days!
Day 1 Check:
- See if symptoms improved or worsened
- If improved → They were sick, not infected (release them)
- If same or worse → Keep monitoring
Day 2 Check (MUST DO):
- If not improved by day 2 → They’re likely infected (eliminate)
- Waiting longer risks them turning into zombies and infecting others in quarantine
Warning: If an infected person turns in quarantine, they will bite and infect all other quarantined survivors!
Basic Resource Management
Three Essential Resources
1. Food
- Feeds survivors in the evacuation zone
- Running out causes riots and chaos
- Check food levels in your tablet regularly
2. Fuel
- Powers your generator and equipment
- Without fuel, your checkpoint shuts down
- Monitor fuel gauge daily
3. Medical Kits
- Treats injured survivors
- Required for quarantine care
- Limited supply - use wisely
Ordering Resources
How to Purchase:
- Open your tablet
- Navigate to “Resources”
- Select quantity to order
- Confirm purchase (costs money from your budget)
Resource Management Tips:
- Don’t wait until you’re empty - order in advance
- Buying in bulk is cheaper but requires more cash upfront
- Check resource consumption rates daily
- Balance spending between resources and upgrades
Base Defense Basics
When Zombie Hordes Attack
Every few days, zombie hordes will assault your checkpoint. You must defend using:
Defense Systems:
- Mini-Gun - Rapid fire, good for crowd control
- Rocket Launcher - High damage, slower reload
- Drone Control - You pilot the drone during attacks
Defense Tips for Beginners
- Prioritize Upgrades - Weak weapons can’t handle later hordes
- Aim for Groups - Focus fire on clustered zombies
- Switch Weapons - Use mini-gun for crowds, rockets for tough enemies
- Don’t Let Them Reach the Gate - If zombies break through, it’s game over
- Upgrade Regularly - Check your tablet for weapon improvements
First Priority Upgrades:
- Mini-gun damage increase
- Rocket reload speed
- Drone durability
Making the Right Decisions
Decision Framework
For each survivor, ask yourself:
1. Do they show symptoms?
- Yes → Quarantine or eliminate
- No → Proceed to step 2
2. Did my tools detect anything?
- UV shows marks → Quarantine minimum, likely eliminate
- High fever → Quarantine
- Clean scan → Proceed to step 3
3. Does their story make sense?
- Suspicious behavior → Additional screening
- Honest and cooperative → Likely safe to pass
Consequence System
If you let an infected person through:
- They infect others in the safe zone
- Your reputation decreases
- May trigger game over if too many slip through
If you eliminate a healthy person:
- You lose morality points
- Families may become hostile
- Budget penalties
Best Practice: When uncertain, use quarantine. It’s safer than guessing wrong.
Common Beginner Mistakes
❌ Mistake #1: Not Using Tools on Everyone
Problem: Trusting survivors without verification
Solution: Always use UV light and thermometer, even if they look healthy
❌ Mistake #2: Ignoring Quarantine Patients
Problem: Leaving people in quarantine too long
Solution: Set a reminder to check them within 2 days
❌ Mistake #3: Running Out of Resources
Problem: Not ordering supplies until they’re empty
Solution: Order when levels reach 30-40%
❌ Mistake #4: Not Upgrading Weapons
Problem: Facing strong hordes with weak equipment
Solution: Upgrade weapons after every successful defense
❌ Mistake #5: Making Hasty Decisions
Problem: Rushing through inspections
Solution: Take your time - accuracy over speed
Your First Week Strategy
Day 1-2: Learn the Basics
- Focus on mastering tool usage
- Practice identifying infection signs
- Get comfortable with the interface
Day 3-4: Resource Management
- Start monitoring resource levels
- Make your first supply orders
- Begin saving money for upgrades
Day 5-7: First Horde Defense
- Expect your first zombie attack around day 5-7
- Use the experience to identify weapon weaknesses
- Immediately upgrade after surviving
Week 1 Goals
- ✅ Successfully screen 50+ survivors
- ✅ Maintain food and fuel above 50%
- ✅ Survive first zombie horde
- ✅ Purchase at least 1 weapon upgrade
- ✅ Use quarantine zone correctly
Quick Tips Summary
Inspection:
- ⚡ Always use UV light and thermometer
- ⚡ Check for hidden bite marks
- ⚡ Don’t trust stories alone
Quarantine:
- ⚡ Check patients within 2 days
- ⚡ Better to quarantine than risk it
- ⚡ Monitor symptom progression
Resources:
- ⚡ Order before running low
- ⚡ Balance all three resources
- ⚡ Don’t overspend early
Defense:
- ⚡ Upgrade weapons regularly
- ⚡ Aim for clustered zombies
- ⚡ Don’t let them reach the gate
General:
- ⚡ Take your time with decisions
- ⚡ Save money for critical upgrades
- ⚡ Learn from mistakes
What’s Next?
Now that you understand the basics, dive deeper with these guides:
Next Steps:
- 📖 Infection Detection Guide - Master symptom identification
- 📖 Base Management Guide - Optimize resources and upgrades
- 📖 Defense Strategies - Advanced combat tactics
Practice in Demo: The free demo on Steam lets you practice these skills risk-free. Download it here
Frequently Asked Questions
Q: How many survivors can I quarantine at once?
A: Initially 4, but you can upgrade this capacity through base improvements.
Q: What happens if I run out of food or fuel?
A: Running out of food causes riots in the safe zone. No fuel means your checkpoint shuts down - both are game over scenarios.
Q: Can I change my decisions after making them?
A: No, all decisions are final. This is why careful inspection is critical.
Q: How often do zombie hordes attack?
A: Approximately every 3-5 days, with increasing difficulty.
Q: Is there a way to practice without consequences?
A: Yes! Play the free demo to practice mechanics without pressure.
Final Thoughts
Quarantine Zone: The Last Check is challenging but rewarding. Success comes from:
- Careful observation over hasty decisions
- Consistent resource management over reactive fixes
- Strategic upgrades over random spending
- Learning from failures over giving up
Remember: You’re humanity’s last hope. Every survivor you correctly screen, every infected person you catch, and every resource decision you make contributes to survival.
Good luck, Checkpoint Officer. Humanity is counting on you! 🎖️
This guide is based on the demo version and official information. Content will be updated as the full game releases in November 2025.
Related Guides
Quarantine Zone Infection Detection - Spot Infected
Master infection detection in Quarantine Zone. Learn UV lights, thermometers, scanners. Identify symptoms and make accurate decisions.
Quarantine Zone Base Management - Resources & Upgrades
Master base management in Quarantine Zone. Learn resource allocation, upgrade priorities, budget management, and facility optimization.